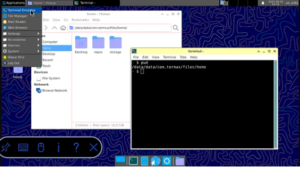
today thanks to termux it is possible to have Linux in your android phone or tablet. With vncserver after it is possible to run a full working Linux desktop on your android machine.
termux is available on google play store and it is free to use. On top of this is possible to install and run ubuntu
in order to install ubuntu this is nice video that explain all the steps:
There I created a new entry connected with 127.0.0.1 with port 5901 (if the vnc server is executed on node 1)
on termux other important vnc server commands are:
#to kill the server on node 1. Mainly done at end of linux activities
vncserver -kill :1

# list of the vnc servers nodes:
vncserver -list
After these command finally Linux is on my android and everything is working but I have often a crash during my activity with following error:
[process completed (signal 9) - press Enter]
In the next paragraph I’m explaining how to fix this error
Termux Signal9 Fix
often when termux is executed, it is crashing with following error:
[process completed (signal 9) - press Enter]
this is really annoying an blocking because all work done in Linux is lost.
this is a possible way to solve this problem:
In android setting activate “development options” and activate and go to “wireless debugging”
click “Pair device with pairing code” where you can get ip_address:port code
without to close the windows (this means to open in split screen view) open also termux
on termux execute the following command
adb pair 192.168.79:46747 39382
where 192.168.79:46747 39382 is just an example of ip address, port and code that you can get clicking on “Pair device with pairing code”
soon after the successful pairing it is important to connect using the ip address and port located on top of “wireless debugging” that you opened before.
adb connect 192.168.79:45745
after successfully connection run the following command
adb shell "/system/bin/device_config set_sync_disabled_for_tests persistent"

adb shell "/system/bin/device_config put activity_manager max_phantom_processes 2147483647"

adb shell settings put global settings_enable_monitor_phantom_procs false
after these command the system is stable and I can run on linux all my important software.
at this point it is not necessary ho have anymore activated “wireless debugging” so it can be disabled again
These are the main software that I use in Linux from my android and they are working really well:
Pycharm
LibreCad
QTcreator
android-studio
FreeCad
kicad
filezilla
It’s truly remarkable how these software applications can run seamlessly on my Android device. Moreover, when I have Samsung DeX at my disposal, I can effortlessly connect it to a large screen, transforming it into a fully functional Linux PC.
What’s more, I always have my Bluetooth keyboard and mouse with me, eliminating the need for me to invest in another computer.
We use cookies on our website to give you the most relevant experience by remembering your preferences and repeat visits. By clicking “Accept All”, you consent to the use of ALL the cookies. However, you may visit "Cookie Settings" to provide a controlled consent.
This website uses cookies to improve your experience while you navigate through the website. Out of these, the cookies that are categorized as necessary are stored on your browser as they are essential for the working of basic functionalities of the website. We also use third-party cookies that help us analyze and understand how you use this website. These cookies will be stored in your browser only with your consent. You also have the option to opt-out of these cookies. But opting out of some of these cookies may affect your browsing experience.
Necessary cookies are absolutely essential for the website to function properly. These cookies ensure basic functionalities and security features of the website, anonymously.
Cookie
Duration
Description
cookielawinfo-checkbox-analytics
11 months
This cookie is set by GDPR Cookie Consent plugin. The cookie is used to store the user consent for the cookies in the category "Analytics".
cookielawinfo-checkbox-functional
11 months
The cookie is set by GDPR cookie consent to record the user consent for the cookies in the category "Functional".
cookielawinfo-checkbox-necessary
11 months
This cookie is set by GDPR Cookie Consent plugin. The cookies is used to store the user consent for the cookies in the category "Necessary".
cookielawinfo-checkbox-others
11 months
This cookie is set by GDPR Cookie Consent plugin. The cookie is used to store the user consent for the cookies in the category "Other.
cookielawinfo-checkbox-performance
11 months
This cookie is set by GDPR Cookie Consent plugin. The cookie is used to store the user consent for the cookies in the category "Performance".
viewed_cookie_policy
11 months
The cookie is set by the GDPR Cookie Consent plugin and is used to store whether or not user has consented to the use of cookies. It does not store any personal data.
Functional cookies help to perform certain functionalities like sharing the content of the website on social media platforms, collect feedbacks, and other third-party features.
Performance cookies are used to understand and analyze the key performance indexes of the website which helps in delivering a better user experience for the visitors.
Analytical cookies are used to understand how visitors interact with the website. These cookies help provide information on metrics the number of visitors, bounce rate, traffic source, etc.
Advertisement cookies are used to provide visitors with relevant ads and marketing campaigns. These cookies track visitors across websites and collect information to provide customized ads.

")


 - from command line")

