Smart TV with Raspberry Pi: Kodi and LibreELEC (formerly XBMC and OpenELEC)
How to turn a television into a media centre with a Raspberry Pi 4 or 5, Kodi and LibreELEC: hardware, installation, HDMI-CEC remote and tips.
https://www.electronics-engineering.com/en/smart-tv-with-raspberry-pi-kodi-and-libreelec/
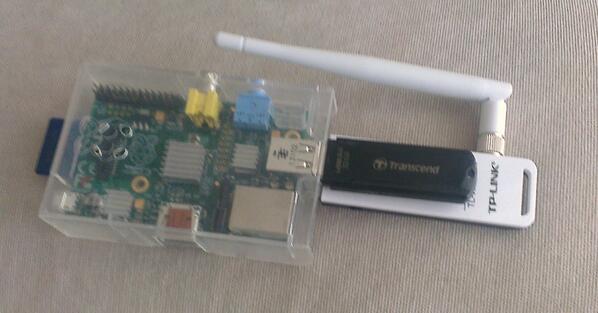
With a Raspberry Pi connected to the HDMI port, any television becomes a complete media centre: films and music from your home drive, internet radio and TV, YouTube, all controlled with the TV’s own remote. When this article was written the most stable combination was XBMC with OpenELEC; since then the names have changed, but the idea has stayed the same and has become much easier to put into practice.
XBMC and OpenELEC today: Kodi and LibreELEC
- XBMC was renamed Kodi in 2014. It is the same program, free and open source, and it is still actively developed.
- OpenELEC, the minimal operating system that started XBMC directly, is no longer updated. Its heir is LibreELEC, born in 2016 from the same developers: a stripped-down Linux that opens Kodi at power-on and nothing else.
The advantage of LibreELEC over installing Kodi on top of a normal system is exactly this: no desktop, no package updates to follow, a start-up in a few seconds and a system that updates itself.
The hardware
The original setup in this article used a first-generation Raspberry Pi, a 32 GB USB stick for data, an 8 GB SD card for booting and a TP-Link TL-WN722N Wi-Fi dongle. Today much less is needed:
- Raspberry Pi 4 or Raspberry Pi 5: both decode 4K HEVC video in hardware. A 2 GB Pi 4 is enough for use as a media centre.
- Official power supply (USB-C, 3 A for the Pi 4, 5 A for the Pi 5): with poor power supplies the system freezes during playback, and it is the most common cause of problems.
- A microSD card of at least 16 GB, preferably class A1.
- A case with a heat sink or fan, especially with the Pi 5.
- A micro HDMI → HDMI cable.
Wi-Fi and Bluetooth are already built in; if possible, however, it is better to connect the Raspberry to the router with a network cable, because high-resolution video from the NAS or from the internet plays much better.
Installation
- Download Raspberry Pi Imager from the official site raspberrypi.com and run it on your PC.
- Choose the Raspberry model, then as operating system Media player OS → LibreELEC in the version suited to your model.
- Select the microSD card and write the image.
- Insert the card in the Raspberry, connect HDMI, network and, last, the power.
- At the first start a wizard asks for language, device name and Wi-Fi network, and lets you enable SSH and Samba sharing, which are useful for copying files from the PC.
Alternatively you can use the LibreELEC USB-SD Creator program, downloadable from libreelec.tv, which does the same thing.
Controlling it with the TV remote
Almost all modern televisions support HDMI-CEC (they call it Anynet+, Simplink, Bravia Sync or other names depending on the brand). Once enabled in the TV menu, the arrows, the OK key and the back key of the remote reach Kodi directly, with no need for extra keyboards or remotes. For those who prefer a smartphone there is the official Kore app for Android.
What to watch
- Home files: Kodi reads shared network folders (SMB or NFS) from a PC or a NAS, or a USB drive connected to the Raspberry, and organises films and series with covers and info cards.
- Add-ons: from the official Kodi repository you install YouTube, internet radio, podcasts and the on-demand services of many broadcasters.
- M3U playlists: with the PVR IPTV Simple Client add-on Kodi shows the channels of an M3U playlist as a normal TV list, with a programme guide if available.
As with any player, only content and playlists that you have the right to watch should be used.
A few tips for a stable system
- If the video stutters, in Settings → Player → Videos enable “Adjust display refresh rate”: the TV synchronises with the 24 or 25 frames per second of the film.
- Leave the automatic LibreELEC updates on: they often fix compatibility problems with televisions and dongles.
- Keep only the system on the SD card and put the library on an external drive or a NAS: SD cards wear out with continuous writes.
The original preview
The following video shows the streaming player built at the time on this setup.




Benvenuti nella pagina su «Smart TV con Raspberry Pi: Kodi e LibreELEC (ex XBMC e OpenELEC)». L'ho scritta pensando a chi studia ingegneria elettronica: se un passaggio non vi torna, un esercizio vi dà un risultato diverso o volete altro materiale sull'argomento, chiedete pure nei commenti e vi risponderò. Un voto con le stelle qui sopra mi aiuta a capire quali pagine migliorare.
consiglio di installare openelec e di fare un overclock dei processori modificando opportunamente i file di configurazione. Funziona benissimo con l’ultima versione di xbmc gotham 13.1
l’overclock e’ consigliabile solo con la configurazione simile a quella sopra descritta. In altri casi la configurazione diventa instabile con rischio di far bloccare il funzionamento del sistema. Consiglio di mettere le alette di raffreddamento sui processori. Tre alette di raffreddamento semplici da trovare su ebay
funziona anche benissimo con tutte le versioni sviluppate tra cui kodi
nel caso in cui comprate il raspberry 2, consiglio di utilizzare la stessa configurazione anche se il sistema e meno stressato per la presenza di tanta memoria e un processore piu’ evoluto. In questo caso le alette di raffreddamento sono 2.
fatemi sapere se avete bisogno di chiarimenti per questa configurazione. Appena posso descrivo accuratamente quello che bisogna fare anche con questa nuova versione di raspberry 2